

Are you getting strike pattern prints again and again? The following document is created only to help you resolve the print head alignment problem in Epson Printers.
What is Print Head Alignment?
Print head alignment is a process that ensures the optimal positioning of the printhead nozzles to improve the quality of the printed output. A printhead comprises numerous ink ejectors or nozzles that work together to produce a seamless print quality. However, when printing a solid patch of color on paper, you may notice faint lines at equal distances. These lines are present even when all the nozzles are working, and they are known as banding. One of the ways to mitigate this issue is by aligning the print head.
Important – Horizontal lines in the print are not only caused by print head alignment, but also by factors such as media movement, media quality, and print settings.
Do I need to do Head Alignment?
Print head alignment is a crucial process that synchronizes the nozzles of all colors of the printhead to enhance the quality of the printed output while reducing the occurrence of color banding. Regardless of the ink used, be it original, Splashjet, or other compatible inks, it is essential to align the print heads.
The frequency of alignment depends on the printer usage pattern, but it is recommended to align the print heads at least once every three months. Apart from periodic alignment, it is advisable to run the printhead alignment whenever you begin using a new set of inks. By doing this, you can ensure optimal print quality and prevent any issues that may arise due to inconsistent printhead calibration.
How to Resolve The Alignment Problem?

The print head alignment problem is a rare issue that might happen due to the prolonged usage of the printer. Some might face this issue for various reasons, for example, paper stuck in the printer. So, how to re-align the print heads? To do so, follow the steps mentioned below properly.
Step 1: Power Supply
- Ensure that the printer is connected to the power supply.
- Power-ON the printer.
- Load 3 to 4 pages of A4 size paper to print the alignment pattern.
Step 2: Head Alignment Settings
Once the printer is connected to the operating system check if the printer drivers are installed properly. Then follow the given steps:
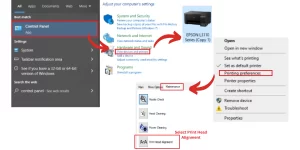
- Go to Control Panel >> Select View Printer & Drivers
- Find your printer >> Right-click on Printer Icon
- Go to Printer Preference >> Select Maintenance
- Select Print Head Alignment
Step 3: Print the Vertical & Horizontal Head Alignment
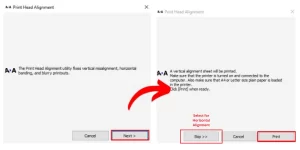
When clicked, a pop-up will appear on the screen asking to continue with the head alignment process. Click on “Next” to continue. In case you wish to perform horizontal head alignment then click on “Skip”.
- Vertical Alignment
At first, the system will perform a vertical alignment process. It will print a sample sheet to check the desired alignment settings and put it in the system. Below is an example of a misaligned print head sample sheet.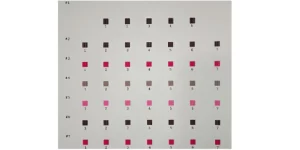
The given pattern shows 47 printed blocks distributed in 7 rows and columns. In the printed pattern, you need to find a perfect or nearly perfect printed block in a row and enter the column number in the table that has popped up on the screen to indicate the desired alignment result to the system. Please check the image shown below:
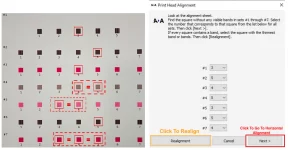
Here we have selected 3,5,4,5,3,5 and 4 values respectively.
Important Note:
In case you get more than one perfect pattern, as shown above, you can choose any of the box values.
If the patterns are perfect then you can click on “Next” to move to Horizontal Head Alignment. If no patterns are aligned in any of the sets then click on “Realignment” and perform the above-shown process again. You may need to perform this process 2-3 times to get an acceptable head alignment pattern.
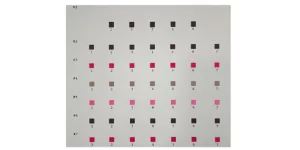
Once it is done. You may see a perfect sample as shown below:
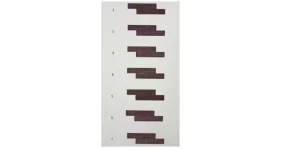
- Horizontal Alignment:
After vertical head alignment, the system will print the sample sheet for horizontal alignment too. The image shown below shows a sample sheet with misaligned print heads.
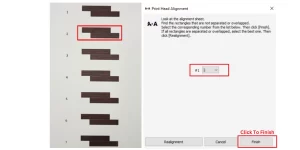
In this sheet, you’ll see 7 rows of printed patterns. In the printed patterns, you need to find a perfect or nearly perfect printed block in a row and enter the column number in the table that has popped up on the screen to indicate the desired alignment result to the system.
If the patterns are perfect then you can click on “Finish” to complete the process. If no patterns are aligned in any of the sets then click on “Realignment” and perform the above-shown process again. You may need to perform this process 2-3 times to get an acceptable head alignment pattern.
Once it is done. You may see a perfect sample as shown below:
Conclusion
This is how you can easily perform the Head Alignment Process for an Epson L3110 Printer. This might not be the same for different brand printers, however, it will give you a brief idea about the cause and solution for the alignment problem.
You can check out our website for more such solutions or reach out to us directly.
Website: https://splashjet-ink.com
Contact details:
Mail – info@splashjet-ink.com
Call / WhatsApp – +91-9209-008-467