Ink changeover is the process of replacing the ink in your printer as per your requirements. It is done when you switch from one type of ink to another.
To ensure your printer continues to deliver vibrant prints, here is the step-by-step guide for ink changeover in your Canon TM5250 Printer:
Part1
Switch “ON” the printer in Service Mode.
To do so, Press the Power Button and Tap on the screen in the below-shown sequence and then Hold the power button for 2 more seconds and release.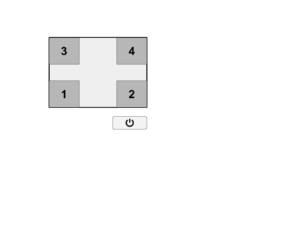
Once the Orange light starts Blinking, it means the printer has entered Service Mode.
You can refer to this video.
Part 2
Once it is confirmed that your printer is in service mode, you need to reset the Maintenance Cartridge. It includes 2 parts:
-
Cleaning the Maintenance Tank:
Step-1: Remove The Maintenance Tank from the printer and remove the waste ink.
Step-2: Remove the Ink Pad and put some tissue paper in it to soak the ink while in use.
Step-3: Put the Maintenance Tank back in the Printer.
-
Resetting the Usage System :
Step-1: Click on Settings ⚙️ >> SERVICE MODE
Step-2: Click on PRINTER STATUS
Step-3: Scroll Down and Click On OTHER CONSUMABLES USAGE LOG
Step-4: Click on MAINTENANCE CARTRIDGE USAGE
Step-5: Click on Reset at the bottom of the screen >> Select YES to execute. The USAGE will appear to be “0”
Step-6: Restart the Printer in Normal Mode (Do not put it back in Service Mode)
Part 3
Before you perform a Changeover, you need to make sure that the ink is removed completely from the Maintenance Tank, Ink Pipe, Printhead, etc.
Step-1: Go to Settings ⚙️ >> Click on Maintenance
Step-2: Scroll and Select Prepare To Move
Step-3: Select Transport Outdoors
Step-4: Click on “YES” to proceed
Step-5: Take out the cartridge and dispose of the remaining ink in the cartridge.
Part 4
When you restart the printer, it will display a message to install the cartridge.
Step-1: Fill each cartridge with 100 ml Splashjet Ink
Step 2: Install the cartridge in the printer
|
Please note – Once you put the ink, the printer performs “ Ink Charging” automatically to transfer the ink in the Ink Tube and Printhead.
|
Part 5
After the auto charging of ink is done, we have to check the nozzle pattern.
To print the nozzle pattern:
Step-1: Go to Settings ⚙️ >> Click on Maintenance
Step-2: Select Print Nozzle Check the pattern
Step-3: Click on “YES” to proceed
The printer will print the nozzle check pattern. Check the printed result with the reference pattern.
|
To perform the Head Cleaning:
Step-1: Go to Settings ⚙️ >> Click on Maintenance
Step-2: Select Print head cleaning
Step-3: Choose Cleaning, Deep cleaning, or System cleaning.
Step 4: Select the ink group to be cleaned:
-
-
- All colors
- Pattern 1: MBK / BK
- Pattern 2: Y / M / C
-
Step-5: Click on “YES” to proceed
The printer will initiate the head cleaning process.
Part 6
Step-1: Take out the cartridge and dispose of the remaining ink in the cartridge.
Step-2: Refill the cartridge with fresh Splashjet Ink
Step-3: Switch ON the printer. You are ready to print.
This is how you can perform the ink changeover process in the Canon TM5250 Printer.